Alright so here it is..

C-XIII

Rookie
My college school has a fairly old stringing machine. A czech tension machine professional style meaning its not table top. Its a crank with I believe six points. I have never strung before they have no manual and im sure it needs some maintence and calibration. I was hoping if any of you guys wouldnt mind posting some info on where the maintence should be applied to and how to calibrate it. I'm sure I can find videos and links on how to and probably find someone to show me but I wanted to immediately start fixing it up and have it ready to go. ALso almost forgot but, I have a yonex rds 001 mid and I dont understand the lingo of the skipping mains or other things. Apparently mine is suppose to be strung as follows:
Mains skip: 8T, 8H
Two Piece
No shared holes

What does this tecnically mean? I assume two piece means I should have the string cut as in its not one long piece that you have it seperate one for the mains and one for crosses. But the skipping or no shared holes I have not a clue on. Thanks for anyone that helps me out!
 
Last edited:

jim e

Legend
Start by watching some of these videos. Unless you have someone to show you how to string, maybe the person that you give your racquet to string may be of some help to show you the basics on getting started. But these below can help you out.
http://tt.tennis-warehouse.com/showthread.php?t=172626

BTW, string the X's 5% lower than the M's, as this is suggested by that Yonex for that model, as well as some of their other models as well. Best that you know what you are doing before you start out.
 
Last edited:

C-XIII

Rookie
Yeah ive been lookin at those videos and thanks to him understand how to prperly mount the rackets and with the other videos on maintence. I also believe i understand how to start the mains. However I do not understand what the terms mains skip or no shared holes or two piece mean i think its more im overthinking it and need it to be put in easy terms.
 

jim e

Legend
Yeah ive been lookin at those videos and thanks to him understand how to prperly mount the rackets and with the other videos on maintence. I also believe i understand how to start the mains. However I do not understand what the terms mains skip or no shared holes or two piece mean i think its more im overthinking it and need it to be put in easy terms.

Look at it this way:
The main strings will start at the head or throat of the racquet. Where it starts is listed with the pattern description. The 1st main on one side is the #1 , and if its at the head, its called 1H, the 2nd hole on the top from the midline is 2H, and the bottom of the racquet at the throat, the 1st midline hole is 1T, next is 2T, etc.There is a right and left 1H, etc.
Where it says main skip, say 8T, that means you would skip the 8th hole at the throat counting from the midline on both sides, if it says skip 8H, that means that you skip the 8th main hole from the top or head of the racquet at both sides
No shared holes means just that, there are no holes that the mains and cross strings both go in, except for tie off locations, and those are numbered as to where they go as well in the pattern description.

Once you start stringing a racquet, it it will become more clear to you on the process.

I believe that YULitle has a video on string numbering as well if my memory is correct.I think it was called Intro to Main Skips and Cross Weaving.That video should point out the questions that you asked about main skips, and string numbering. I know on some of his videos he discusses 1 piece and 2 piece stringing, along with ATW patterns and why.Did you view all of the videos he made? If not may be best to take another look, and your questions will be answered. Although his videos are not in order, they are pretty thorough and gives a good description.
 
Last edited:

C-XIII

Rookie
jim e thanks alot I was confusing the video on intro to mains skips and cross weaving. I totally understand that part now and thanks on the no hole shared part. I guess the onlny thing Im confused on is figuring out tie off spots. Is it just based off the string pattern 16X18 or is it more just where the string ends im just tieing it off there?I have one of my yonex's still strung so i see where they did indeed tie it off so i assume id just tie off there correct. I just wanted to learn how to figure out how to do other different rackets like for other team mates and such. THanks
 

jim e

Legend
The tie offs are where the knots are tied.
When you look up the patterns for your racquet, the tie offs are listed, using same grommet hole numbering system. Like if a tie off is listed as 5H, that would mean its the tie off for the knot at the 5th grommet from the midpoint at the head of the racquet.
Also, because the tie offs are already on your racquet, (where the knots are now), does not really mean that the last stringer used the proper ones, not that it makes that much of a difference, but when I string, I use the recommended tie off spots.Usually you can spot the proper tie offs as the grommet hole is wider to accomodate 2 strings.
 

Radicalized

Professional
I believe I have the correct pattern. I got it from one of the well known stringer sites that gives patterns.
yonex001mid.jpg


I didn't see the it on the list at the official Yonex site.
Yonex RDS 001 MID 90 sq. in.
55-65 lbs. tension
16M X 18C
Mains Skip: 8H,8T
Tie Off Mains at 7T
Tie on crosses at 6H
Tie off crosses at 11T
Start at throat.
String length: 19' Mains/17' Crosses

For your string, I'd probably (Measure your full set first to determine its exact length.) give myself a little extra length when I cut the string. I might use something like 22'M and 18'C if I have a 40' set and I'm not doing a hybrid. I don't know the racquet or the string type and elongation properties. The pros here might be able to estimate better. I'm just making the point to be extra careful the first time so you can see what you need. Sets usually say 40', but they could be a foot or more longer--and hopefully not shorter. Maybe you have a reel?

MAINS:
I guess you've learned the basics from the videos, but start at the throat with this racquet. Tension a main on one side, and then the other, never getting more than two ahead on a side. Tension one string at a time. Remember when to skip grommets as noted in the instructions. When you complete the mains, tie off on both sides as indicated with finishing knots, such as the Parnell.

CROSSES:
Tie a starting knot (not the same as a finishing knot--although some use the same knots apparently) where shown and thread the string through the proper grommets as shown to start the first cross. Weave one ahead (look it up on the board if you don't know). Tension one cross at a time. Weave under and over the mains, alternating the under and over weave as shown (see a racquet). When done, use a finishing knot to tie off the crosses where shown.

Check the pattern with your racquet before you try it. Just trying to help here. The checking part is up to you.
 

C-XIII

Rookie
Holy cow I owe you hard core for that info and guide pick! Question on starting the crosses and tieing do i need a stringers starting clamp to start the first cross and such?
 

jim e

Legend
Question on starting the crosses and tieing do i need a stringers starting clamp to start the first cross and such?

If you have fixed clamps, the easiest way to start is to tie a starting knot at the tie off that would be 6H, then weave your 1st cross string at 8H, tension and clamp with machines fixed clamp.
Of course if you do have a starting clamp, you could just clamp the string at the beginning of the cross on outside of racquet at 8H with the starting clamp, (be sure that you leave enough string to reach the tension head), weave that 1st cross string, tension, clamp with machines fixed clamp, then you can go back to the other end of that 1st cross string, pull tension again, remove the starting clamp, clamp with the machines fixed clamp, and tie off a finishing knot at 6H .Now you are ready to continue. Weave one ahead to make weaving easier.

Be sure that you do string the cross strings from the top down, and also string the cross strings 5% lower than the main strings as listed by Yonex for that racquet.
 
Last edited:

Radicalized

Professional
You don't need a stringers clamp. See "#8" below for the answer in a video. YULitle shows the use of a starting clamp there, but it isn't necessary.

I'd view and read everything now. Don't get lazy with that. It'll save you time and headaches in the future. Work through it in your mind.

A quick rundown, in general, what you need to do again:

I'm assuming from this point that you done your maintenance--most importantly cleaned the clamps and tensioner (assuming they still grip fine) and you've calibrated the tension. How to do this is mentioned all of the time on TT. You may have already been asking about this, if I remember correctly.

Go to this youtube site. It's the channel for the famous YULitle ones I think you've watched: http://www.youtube.com/yulitle

Make sure to watch these videos and perform in this order (some videos are specific ways to perform the necessary action). They will be a generalization in terms of equipment, as you said you'll be using an old crank model.

If your racquet is still strung:
Cutting Strings out of a Racket
STRINGER USE:
1. Mounting - 6-Point
2. Swivel Clamps - Use and Operation
MAINS:
3. Getting Mains Started - Two-piece
4. How to Start Your Mains
5. Parnell Knot (To tie off)--see #6
6. How to tighten your knots (shows parnell in example)
CROSSES:
7. Bulky (starting) knot (there are others on the site--try this one)
8. Starting Crosses with a Starting Knot (note: YULitle weaves his second cross first in the video, then weaves the first cross and puts string through the grommet where he will tie the starting knot around the main. Then he ties the knot, tightens it, and pulls tension.
9. Intro to Main Skips and Cross Weaving
10. How to Pass String thru Blocked Grommets
11. Why to Pull Hard Weaves Twice
12. Weaving Crosses
13. Parnell Knot (To tie off)
14. How to tighten your knots
15. Mounting - 6-Point (remove the racquet properly)

A note on tools: You didn't mention what stringing hand tools you have. If there are none there, you might want to at least get yourself a set of mini-pliers (any store with hardware--prices vary--not expensive). A set with diagonal cut, flat nose, bent, and needle nose are nice. The second two usually have a smooth grabbing surface and no wire cutter to accidentally cut or tear up the string. An awl may or may not be necessary. I have one, but I never use it (see #10 above). I also have a pathfinder awl (don't use). I do use a pair of micro flush cutters to cut the extra length of tails from my knots. And get a ruler, or better, a wide measuring tape or yard stick. Or make one on a roll of paper you can tape down. For some reason, I see questions about measuring on this board where some say they can't or hate measuring :confused: I do know people who have trouble with this, in general :shock: .

I don't know your machine or if this will help, but here is a manual for a particular crank machine: http://www.sptennis.com/stringer.asp#JAZZ

Find the "Download Owner's Manual" and save it or open it. Needs Adobe Acrobat Reader. You'll have to compare. Just something extra as a visual aid in figuring this stuff out. I don't use a crank. I'd have no idea anyway with the description, "old czech tension machine." Other directions in the manual are usable, too, such as some basic knots (not the same ones as noted above). See "Tension Calibration" on page 12. Tennis warehouse: http://www.tennis-warehouse.com/descpage-TENCAL.html for a calibrator.
 

Radicalized

Professional
Edit: I noticed I wrote "stringers clamp" in the first sentence in my above post. I meant "starting clamp." Sorry. Don't know how that happened. :oops:
 

C-XIII

Rookie
Thanks for more info the manual will come in handy. I do not have a tension calibrator so I cannot do that yet but i plan on just learning on some bad old rackets my h.s. threw out two years ago. I will then by a tension calibrator and go ahead and try stringing my actual racket. Yeah i got confused with i guess what number 8 ment so Ill go through it again and just focus. I think I have it all down now overall just gotta go out and practice. THanks guys@!
 

Radicalized

Professional
Yeah i got confused with i guess what number 8 ment so Ill go through it again and just focus.

Sorry. If you mean confused with "number 8" where I said, "See #8 below," as that refers to the numbers of the list in my post (#1 to #15), in this case regarding the video about starting crosses with a starting knot (to answer your question of needing a starting clamp or not). That list is an organized list of the YULitle Videos at "youtube.com/yulitle" that you should definitely watch to complete a racquet likes yours--in other words, a 2-piece job using only a starting knot. If you go to the Youtube channel page noted above, the video names are listed in the column at the right. Again, they correspond to the names in my list that I think you should definitely watch. The number order is the order in which you would need the knowledge to apply it in an actual racquet stringing.

You should note which racquets you are stringing so you use the proper pattern for them. You may find the patterns here :
http://www.sptennis.com/patterns.html
or
http://www.klipperusa.com/stringing/manufacturers.php.

Patterns are sometimes written slightly differently. They may say, for example, B for bottom, instead of T for Throat. And to confuse some, they may use a T for Top, instead of H for Head. Sometimes they count differently also. Generally, it is 1,2,3..., on the right and left sides of the middle of the frame, and have it numbered that way at both the head and throat of the racquet like the diagram I posted of your racquet. You can always figure it out and rewrite it to your liking. Make sure you read the "key" for the pattern so you know what the letters mean in a particular case.

If you were simply talking about being confused about skipping "8" in the Head and Throat of your racquet, I guess you know by now that you don't run a main string through grommet 8 in the head or throat on either side of the racquet, as noted in the diagram, but go from grommet 7 to 9 with your mains.
 

Irvin

Talk Tennis Guru
I believe I have the correct pattern. I got it from one of the well known stringer sites that gives patterns...

I didn't see the it on the list at the official Yonex site.
Yonex RDS 001 MID 90 sq. in.
55-65 lbs. tension
16M X 18C
Mains Skip: 8H,8T
Tie Off Mains at 7T
Tie on crosses at 6H
Tie off crosses at 11T
Start at throat.
String length: 19' Mains/17' Crosses
...

Close but no cigar. Check the link I gave you and you will see the stringing patterns on the Yonnex site for both the RDiS 100 mid (93 si 16x20) and mid plus (98 si 16x19.) Neither are 16x18 and neither are 90 si.

http://www.yonex.com/tennis/stringin...ons/index.html There is also a picture on the yonex site for each of their EDiS 100 rackets. You did draw a nice picture though 'Radicalized' just not the right racket, patern, or tension range (50-65 lbs.)

Irvin
 

Radicalized

Professional
He wrote:

ALso almost forgot but, I have a yonex rds 001 mid and I dont understand the lingo of the skipping mains or other things.

He wrote Yonex RDS 001 Mid, not Mid Plus. The RDS 001 Mid is a 90. The RDS 001 Mid Plus is 98. He even asked TW about it (the 001 mid in stock or not):
http://tt.tennis-warehouse.com/showthread.php?t=346272

I searched the board to look for the model because I didn't have the pattern or know the racquet and even came up with one of his posts where he asks for it, the RDS 001 Mid, which TW responds is a '08 model and they aren't getting any more in stock. He didn't say RDiS. Doesn't that link, like often happens, only show the newer/current models? Sorry if I'm wrong again, but that is what I see.

Here is the racquet page: http://www.yonexusa.com/displayproduct.cfm?productid=11 for the 90 sq. inch 001.
They also have link on that page for the 98 Mid Plus (98), but he said Mid.

He can tell us if it is the 90" at the above link or not, but if he meant the plus, he should have said it.
 

Radicalized

Professional
I don't want to push the point, as I'm just trying to help a college kid get up and running on some machine he knows little about that is there for his use if he can learn the necessary skills. I can't tell you how much stuff I've had in school that I could have used, but got little to no help with its use.

But, checking the current TW Yonex page, there is only the MidPLUS in the RDS category of their product line. However, if you Google "Yonex RDS 001 90," the top link is for TW. If you click on the "Cached" link for the page, you will get the old TW product page it (without a price). Only putting some of the TW description:
Mid
The RDS 001 Mid is another solid player's racquet from Yonex.
Midsize Specs :arrow:
Head Size:
90 sq. in. / 581 sq. cm.
Length: 27 inches / 69 cm
Strung Weight: 12.1oz / 343g
Balance: 10pts Head Light
Swingweight: 323
Stiffness: 65
Beam Width: 18-20 mm
Composition: High Modulus Graphite / Elastic Ti
Power Level: Low
Swing Speed: Fast
Grip Type: Yonex Cushion Grip
String Pattern:
16 Mains / 18 Crosses
Mains skip: 8T, 8H
Two Piece
No shared holes
String Tension: 55-65 pounds

Again, the live TW http://www.tennis-warehouse.com/Yonex_RDS_001_Midplus/descpageRCYONEX-RD08MP.html
shows the MIDPLUS version and writes it as such:

Midplus Specs :arrow:
Head Size:
98 sq. in. / 632 sq. cm.
Length: 27 inches / 69 cm
Strung Weight: 11.7oz / 332g
Balance: 8pts Head Light
Swingweight: 322
Stiffness: 68
Beam Width: 18-21 mm
Composition: High Modulus Graphite / Elastic Ti
Power Level: Low
Swing Speed: Fast
Grip Type: Yonex Cushion Grip
String Pattern:
16 Mains / 19 Crosses
Mains skip: 8T, 8H
Two Piece
No shared holes
String Tension: 55-65 pounds

So, weather he has the Mid as he wrote, or the Mid Plus version, I don't know. If he has the Mid Plus 98, he can say so, and I will happily redo the pattern for him to follow if he would like that.
 

Radicalized

Professional
Edit: Crazy--I wrote "weather" instead of "whether" in the last paragraph above. Someone hit me with a 120mph serve! Yikes! Embarrassed again. Enough TT for now.
 

Radicalized

Professional
'Radicalized' you are right, sorry.

Irvin

No problem, Irvin. So many models. I wish they would have a place for the patterns of all the models one might own at the manufacturer sites. It would take so little storage space. And I'm "Radicalized" because I use a Head Radical, not because I'm extreme or in need of anti-oxidants. :cool:
 

Nellie

Hall of Fame
I think if you take an old, previously strung racquet, mark the pattern, and re-string with exactly the same pattern and tie positions, you will quickly figure out how to adjust to a different racquet.
 

struggle

Legend
I think if you take an old, previously strung racquet, mark the pattern, and re-string with exactly the same pattern and tie positions, you will quickly figure out how to adjust to a different racquet.


this is very true, assuming it was strung properly in the first place.
 

C-XIII

Rookie
Yeah I have the right patterns down TW did string it correctly according to radicalized specs shown and they make sense. Sadly my school had no supplies for the stringing IE tension calibrator which is needed because its old as heck, awls, pliers or any other die hard needed tools haha. So when my strings broke and I was actually going to try it on my actual racket I couldnt and therefore had to dish out the 20dollars to restring it(not including strings I gave my own). But man am i excited to try out stringing rackets it looks like itll be fun and good to know!
 

struggle

Legend
sounds like you'll be good at it once you get started.

order the basic tools (you'll need them when you get your own machine anyhow). start stringing. it's not very difficult.
 

C-XIII

Rookie
With the starting knot for crosses I am confused with one thing I actually noticed which would be Yulite states that you can pull tension on it once its against the racket and such. Im pulling the tension once I make my first weave through correct? Just want to make sure and all. Also for my racket I tie cross at 6h so i put the cross string through the grommet along my anchor string for the know ill make, make a starting knot, cut off the end that sticks out towards the mains and proceed with the bulk of string on the other side of the grommet making my actually first cross at 8h and then tensioning it?
 

Radicalized

Professional
With the starting knot for crosses I am confused with one thing I actually noticed which would be Yulite states that you can pull tension on it once its against the racket and such. Im pulling the tension once I make my first weave through correct? Just want to make sure and all. Also for my racket I tie cross at 6h so i put the cross string through the grommet along my anchor string for the know ill make, make a starting knot, cut off the end that sticks out towards the mains and proceed with the bulk of string on the other side of the grommet making my actually first cross at 8h and then tensioning it?

What YULitle does in the video is (and you can do part of this differently):
1. He has the string that he'll use for the crosses and weaves the "second cross" first--you don't have to do it in this order. I can repeat what he says about this now, but I don't want to get on that path right now.
2. Then he weaves the string through for the first cross--remember to keep the proper weaving under/over pattern as you do this.
3. Then he takes the string that will be used for the starting knot and puts it through the grommet where the starting knot will be tied--in the case of your Yonex Rds 001, grommet 6H.
4. He then ties the so-called "Bulky Knot" around the main that goes through 6H grommet. See his particular video on the Bulk Knot for his large-scale demo of this.
5. He then pulls the string on either side of the knot to tighten it (about 1m22s in video). You can use some pliers for this. I don't use a starting clamp. I use a wider pair that has a smooth inner surface and my hand.
6. He then pulls tension on the first string (this is optional) to pull the slack out of the knot and seat it so when he pulls the first cross, he losing some of the pulling tension in pulling the cross AND having the knot tighten up during the tensioning action.
7. Then he pulls the first cross to tension it and will clamp.
8. He trims the tail.

You could tie the knot, run the string through the proper grommets as in the pattern and pull tension on the first cross.

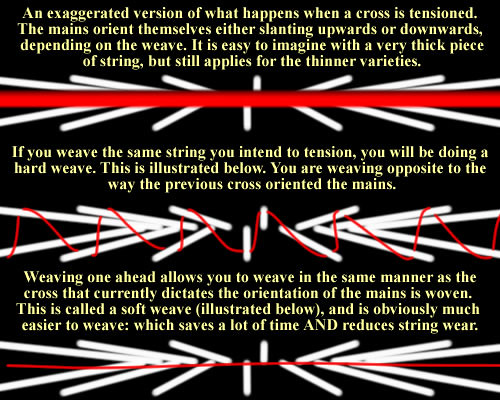
As I've noted previous, you should weave one ahead. Which means, weave the second and tension the first, weave the third and tension the second, and so on. This reduces time to weave and decreases some of the friction. Just leave a big enough "loop" so you have a long enough run of string to pull tension with to reach the tension head/gripper.

Then keep weaving and tensioning. Then tie a finishing knot when your crosses are done. Weaving will be more difficult at the end. And remember to fan the string as you pull as not to cause friction burns and notch the string.
 

Radicalized

Professional
Edit: 6. He then pulls tension on the first string (this is optional) to pull the slack out of the knot and seat it so when he pulls the first cross, HE'S NOT losing some of the pulling tension in pulling the cross AND having the knot tighten up during the tensioning action. All the tension force is going to one or the other, more or less.
 

Radicalized

Professional
And if you tie the Bulky Knot, for example, when you cut the extra little tail off, that little tail that comes from the knot should lie nicely against the frame. It won't protrude into the string bed.
 

Radicalized

Professional
Edit: Not having a good writing and editing day today:
From an above post:
As I've noted PREVIOUSLY, you should weave one ahead, which means, weave the second and tension the first, weave the third and tension the second, and so on. You can search the board for a detailed explanation why. This reduces time to weave and decreases some of the friction. Just leave a big enough "loop" so you have a long enough run of string to pull tension and to reach the tension head/gripper.
 

Radicalized

Professional
Also for my racket I tie cross at 6h so i put the cross string through the grommet along my anchor string for the know ill make, make a starting knot, cut off the end that sticks out towards the mains and proceed with the bulk of string on the other side of the grommet making my actually first cross at 8h and then tensioning it?


I should have elaborated more on one thing and missed one thing:

As noted, you tie the cross at 6H around the main there as the "anchor string" (for your rds 001). Yes, one end of the cross string you start with will be the tail of the knot, and the other will be the, as you wrote it, "bulk of string on the other side of the grommet making [the] first cross at 8H."

But as noted previously, however you do it, have the second cross woven before tensioning the first. Tension the first. Clamp. Move on to rest of racquet.

I don't know how many racquets you have, but you may wish to photograph your racquet before cutting strings out so if you have that beginner feeling you wish you had another "real racquet" to look at, you'll have something to examine.

Note: Your crosses in the pattern I posted tie off on a cross, rather than a main. Again, you said you're sure, but just examine all of this beforehand so you get the idea of what you are replicating. And again, just to completely authenticate for myself, I quickly searched cached versions of the official Yonex stringing instructions page, and even the caches are too new and don't show the RDS 001 instructions.
 

Nellie

Hall of Fame
Yeah I have the right patterns down TW did string it correctly according to radicalized specs shown and they make sense. Sadly my school had no supplies for the stringing IE tension calibrator which is needed because its old as heck, awls, pliers or any other die hard needed tools haha. So when my strings broke and I was actually going to try it on my actual racket I couldnt and therefore had to dish out the 20dollars to restring it(not including strings I gave my own). But man am i excited to try out stringing rackets it looks like itll be fun and good to know!

I have seen some digital scales for sale online for cheap - less than $10, that you could use for calibrating. More importantly, the exact number does not matter, so long as you string at an indicted tension, hit to determining if you like the feel, and adjust for your own tastes.
 
Top