You are using an out of date browser. It may not display this or other websites correctly.
You should upgrade or use an alternative browser.
You should upgrade or use an alternative browser.
silent partner edge lite mod
- Thread starter Frankauc
- Start date
I am also interested in the adding of a remote. I do recall there were a couple of people who were going to try it over the holidays. Love to hear if they tried and how it worked out.
With regards to the battery issue. Did you purchase a new lite (lobster style) or an older one? I have an older one and it is extremely easy to fit the unit with a second battery. The wiring harness is already there allowing both batteries to be charged at the same time. This may be possible with the newer one as well I just can't comment since I haven't seen one up close.
With regards to the battery issue. Did you purchase a new lite (lobster style) or an older one? I have an older one and it is extremely easy to fit the unit with a second battery. The wiring harness is already there allowing both batteries to be charged at the same time. This may be possible with the newer one as well I just can't comment since I haven't seen one up close.
HitItHarder
Semi-Pro
I still have the 15 amp relay remote sitting at my house, but I haven't tried to install it yet on my SP Edge Lite. I am using the machine once or twice a week, but usually I have one other person with me so it hasn't been enough of an issue to install the remote yet to see if it works.
As far as the battery, I am actually quite pleased with the 2 hour battery so far. I typically only hit on the machine for an 1 to 1 1/2 hours when you add in the time it takes me to stop, pick up balls, and reload the machine. Unless something changes, the regular battery will likely be fine for my personal use. I have been pleasantly surprised.
As far as the battery, I am actually quite pleased with the 2 hour battery so far. I typically only hit on the machine for an 1 to 1 1/2 hours when you add in the time it takes me to stop, pick up balls, and reload the machine. Unless something changes, the regular battery will likely be fine for my personal use. I have been pleasantly surprised.
would that remote work?
http://cgi. e b a y.com/2CH-RF-Wireless-Remote-Control-Transmitter-Receiver-d_W0QQitemZ360225486785QQcmdZViewItemQQptZLH_DefaultDomain_0?hash=item53df1cb7c1#ht_4048wt_1277
http://cgi. e b a y.com/2CH-RF-Wireless-Remote-Control-Transmitter-Receiver-d_W0QQitemZ360225486785QQcmdZViewItemQQptZLH_DefaultDomain_0?hash=item53df1cb7c1#ht_4048wt_1277
parasailing
Legend
As far as the battery, I am actually quite pleased with the 2 hour battery so far. I typically only hit on the machine for an 1 to 1 1/2 hours when you add in the time it takes me to stop, pick up balls, and reload the machine. Unless something changes, the regular battery will likely be fine for my personal use. I have been pleasantly surprised.
The battery after a few months will degrade slightly and you will probably be hitting no more than 300 to 400 balls if you set the spin to max. I had to send back the machine for service and had them upgrade the battery.
HitItHarder
Semi-Pro
would that remote work?
http://cgi. e b a y.com/2CH-RF-Wireless-Remote-Control-Transmitter-Receiver-d_W0QQitemZ360225486785QQcmdZViewItemQQptZLH_DefaultDomain_0?hash=item53df1cb7c1#ht_4048wt_1277
Couldn't get the link to pull up, but a quick search on that site of 2CH-RF-Wireless-Remote-Control-Transmitter-Receiver pulled up several that look like they should work. But as with most things, there is aways some risk with do it yourself mods. You need one that takes a 12v power source and 15amps should be an appropriate size for the relay. If you have a basic understanding of wiring, you should be able to figure out the installation.
The battery after a few months will degrade slightly and you will probably be hitting no more than 300 to 400 balls if you set the spin to max. I had to send back the machine for service and had them upgrade the battery.
That is true about battery life fading with time and use. I will give an update in another month or two.
As for the machine speeds, at the moment I am using the speed at 5 and spin at 4 (on a 0-10 scale). It is plenty for me to get a good work out, so the lower speed may be give me more battery life as well.
Couldn't get the link to pull up, but a quick search on that site of 2CH-RF-Wireless-Remote-Control-Transmitter-Receiver pulled up several that look like they should work. But as with most things, there is aways some risk with do it yourself mods. You need one that takes a 12v power source and 15amps should be an appropriate size for the relay. If you have a basic understanding of wiring, you should be able to figure out the installation.
That is true about battery life fading with time and use. I will give an update in another month or two.
As for the machine speeds, at the moment I am using the speed at 5 and spin at 4 (on a 0-10 scale). It is plenty for me to get a good work out, so the lower speed may be give me more battery life as well.
the link is good, juste put the letters e b a y together.
thanks for your advice
tennisdad65
Hall of Fame
It probably voids the 1 yr warranty by tapping in internally? I am getting the lite delivered this week!!
It probably voids the 1 yr warranty by tapping in internally? I am getting the lite delivered this week!!
I'd say that's a given unless you wire it in a way you can reverse later without being obvious.
tennisdad65
Hall of Fame
The battery after a few months will degrade slightly and you will probably be hitting no more than 300 to 400 balls if you set the spin to max. I had to send back the machine for service and had them upgrade the battery.
Don't they sell a backup battery for $40? or is it a replacement batter?
Is it possible to take a backup battery to the courts, and if needed, change it in the middle of a session?
drclawscat
New User
You can get batteries with higher amps elsewhere and swap them into the machine. The edge series is not an easy swap and replace like the older series from what I've read, since there is no battery bay/door.
Looking at the insx manual for the edge, the actual remote requires that the Power switch and Oscillation switch both be turned on for the remote to work. The remote functions are wired as 'normally open' so the functions will work w/o a remote.
Adding an external receiver board you would probably splice the oscillator control wire and the power switch wire after the switches and wire these into the relay as normally open, so that the first press of both functions would turn off the machine and the oscillator, and every subsequent switch would flip back and forth.
The battery after a few months will degrade slightly and you will probably be hitting no more than 300 to 400 balls if you set the spin to max. I had to send back the machine for service and had them upgrade the battery.
I just order the edge lite. He said the battery will only last an hour at speed 5 and that I cannot upgrade to the heavy duty battery. Did they only offer this to you because you were dissatisfied? How much was it? thanks
parasailing
Legend
I just order the edge lite. He said the battery will only last an hour at speed 5 and that I cannot upgrade to the heavy duty battery. Did they only offer this to you because you were dissatisfied? How much was it? thanks
I sent the machine back to fix the sweep function and at the time, I asked them how much to upgrade the battery and they said $60. There is another thread on this machine where someone actually bought the battery for around $20 something and did his own upgrade.
drclawscat
New User
I took a look at the circuit this weekend and the attached schematic is one way to add a remote. I am in no way condoning modding your machine and it will void your warranty so do so at your own risk (although the circuit below can be built without modifying anything at all). I have not wired this into my own machine.
Normally the blue side of the breaker connects to Pin 1 of the power switch. You would reroute it to your min 15A relay wired in a toggle configuration as normally open. The oscillator gray wire you would reroute to the other relay
in normally open as well.
I put a seperate toggle switch in front of the receiver to deactivate power to the receiver when the machine is being stored to reduce any small parasitic draw from the rf receiver and also to reset the relays to Normally open in case you lose the remote. You could probably add a momentary Normally open switch here to reset the relays to N.O. as well but the receiver would always be on. You will need to trace your own wiring as the colors of the butt connectors could be different.
With this configuration you would need the power switch and oscillator switch turned on for both functions to work on the remote just like the Edge Star.
A nice receiver with 2 20A/14VDC relays can be found on virtual village; do a search for: "2-channel-rf-433mhz-wireless-remote-control-module"
http://i217.photobucket.com/albums/cc245/sumwokq/****/circuit.jpg
drclawscat
New User
how do you embed images in the post in this forum?
drclawscat
New User
HTML:
<a href="http://s217.photobucket.com/albums/cc245/sumwokq/****/?action=view¤t=circuit.jpg" target="_blank"><img src="http://i217.photobucket.com/albums/cc245/sumwokq/****/circuit.jpg" border="0" alt="Photobucket"></a>hopefully this works???
drclawscat
New User
I had a banned keyword in there before, here it is:

drclawscat
New User
So I tried this out yesterday and It works well. Very responsive and makes a beep to let you know the signal has been read. Range seems extremely good. Only problem is that the receiver I ended up getting in the mail turned out to have only 7A @ 28VDC which was not enough current to wire it up like the way I have shown to cut off power to the system and oscillator on both channels.
Instead I wired it up like the Star to control feed an oscillation since those require very little current (using 22 awg wire from the factory). I would have preferred to wire it like the diagram i posted to conserve battery life but i don't know any any two channel transmitter with at least one relay being a min of 15amps. The circuit breaker is 15amp I believe. I can post some pics later when I have time.
Instead I wired it up like the Star to control feed an oscillation since those require very little current (using 22 awg wire from the factory). I would have preferred to wire it like the diagram i posted to conserve battery life but i don't know any any two channel transmitter with at least one relay being a min of 15amps. The circuit breaker is 15amp I believe. I can post some pics later when I have time.
So I tried this out yesterday and It works well. Very responsive and makes a beep to let you know the signal has been read. Range seems extremely good. Only problem is that the receiver I ended up getting in the mail turned out to have only 7A @ 28VDC which was not enough current to wire it up like the way I have shown to cut off power to the system and oscillator on both channels.
Instead I wired it up like the Star to control feed an oscillation since those require very little current (using 22 awg wire from the factory). I would have preferred to wire it like the diagram i posted to conserve battery life but i don't know any any two channel transmitter with at least one relay being a min of 15amps. The circuit breaker is 15amp I believe. I can post some pics later when I have time.
hi drclawscat. can you post pics of you mod.
also, i found a website where you can buy remotes and receivers. wich one of those would work? http://www.carymart.com/index.php?main_page=index&cPath=66
thx!
Last edited:
drclawscat
New User
hi drclawscat. can you post pics of you mod.
also, i found a website where you can buy remotes and receivers. wich one of those would work? http://www.carymart.com/index.php?main_page=index&cPath=66
thx!
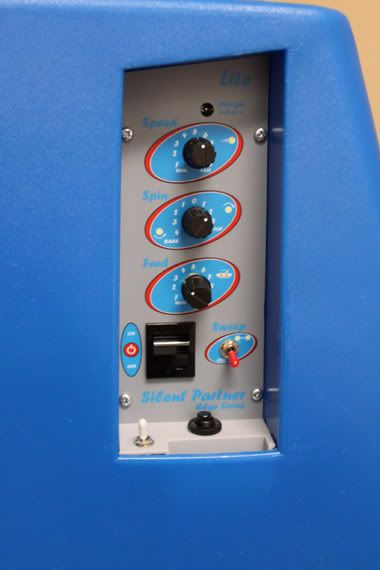
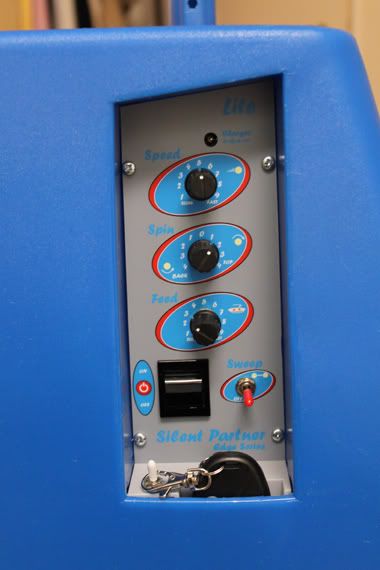
Frank, not much to show in the images except for the control panel. The wiring is messy to decipher whats going on. Basically there are two ways you can wire it. The way I showed initially, OR you can substitute the Power switch wiring with just cutting the feed wiring from the main switch. It's the thin red wire coming out of box 3 in the power switch in my circuit. 1 connects to 4 and 3 goes to the pcb. (the view of the circuit is looking at the back of the switch).
If you wire it the latter way any low Amp rated dual channel should work. If you want to cut power to the main and the oscillator like the circuit you will need a min 15amp 12vdc.
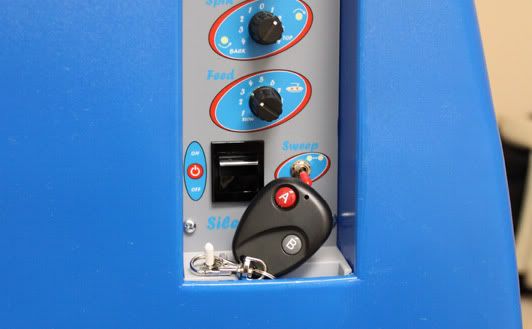
I added rubber 'hats' to the sweep and [new] remote switch. The remote switch powers the receiver and resets the relays to Normally Open in the event you lose your remote.
drclawscat
New User
I just 'pimped' my sp lite a bit more the other night. Installed a 20ah AGM SLA battery into it. It works out great so far. The standard 7.2ah that comes with it I found would start to die after 1:15 of hitting so I definitely needed an upgrade. The connections were really easy, I dremeled down 2 Quick Release connectors to fit the F1 female ends, and then added a piece of wire between that and a spade connector which I hooked into the nut and bolt terminals of the battery. No wire modifications. 4 7-8" zipties will secure the new battery which fits exactly in the larger battery slot.
Man the case is a serious beeyatch to get back on because of the motor elevation bolt. Getting it off is no fun either; easier with 2 people. The larger battery won't fit in the ejection port since it's way to tall to get past the motors so you have to take the case off. Be careful not to damage/crush the circuit-board and ball ramp when you put it back together.
Man the case is a serious beeyatch to get back on because of the motor elevation bolt. Getting it off is no fun either; easier with 2 people. The larger battery won't fit in the ejection port since it's way to tall to get past the motors so you have to take the case off. Be careful not to damage/crush the circuit-board and ball ramp when you put it back together.
drclawscat
New User
I got it for 40 on fleabay. Got it from seller ptron1. I called the other company to complain about the relays on my receiver being rated lower than advertised so they refunded me the cost. I ended up getting the receiver for free!
hi i just opened my machine to do the mod. like you say its not easy to open this thing!
im not an expert so i want to do it the simpliest way (like the star)
so where can i find a diagram for this method like the one you did?
this is my receiver circuit http://images.carymart.com/0020021/s2t-dc12-3.gif
thx
im not an expert so i want to do it the simpliest way (like the star)
so where can i find a diagram for this method like the one you did?
this is my receiver circuit http://images.carymart.com/0020021/s2t-dc12-3.gif
thx
Last edited:
also i got a new bat 12v 20amp
it fits well in the bigger bat slot but how did you secure it with 4 7-8" zipties? You just connect them and join them through the two side holes? So it will just prevent it to move vertically (it doesnt move sideways because of the slot ).
im just not sure how to connect the remote receiver
thx
it fits well in the bigger bat slot but how did you secure it with 4 7-8" zipties? You just connect them and join them through the two side holes? So it will just prevent it to move vertically (it doesnt move sideways because of the slot ).
im just not sure how to connect the remote receiver
thx
so i modified your pic drclawscat to show how my circuit is made
i need help to know which wire do i have to cut and put it into the relay to control the feed
thx

ImageShack.us
i need help to know which wire do i have to cut and put it into the relay to control the feed
thx

ImageShack.us
drclawscat
New User
so i modified your pic drclawscat to show how my circuit is made
i need help to know which wire do i have to cut and put it into the relay to control the feed
thx
Hi Frankauc, Since your relays are only 7amp 12vdc you will want to wire feed and oscillator functions. There are only two wires you will want to clip in the machine.
1)Oscillator - clip the small gray wire coming out of the oscillator switch (blue would work too, grey is preferred) and reroute both clipped ends to your receiver for one relay
2)Feed - Clip the small red wire coming out of the 3 (if you are looking at the machine normally from the outside all assembled, 3 would be on the top left corner of the power switch I believe, but do double check) and reroute both clipped ends to your receiver for the 2nd relay.
You should not be modifying or connecting any other wiring (as in connecting 1 to 3 above, that would have the feed always on since power is held in 1, flipping the switch gives it to 2 and also 4, which is connected to 3:feed). Just those two wire clips will do it. Thinking about it, wiring the receiver power to 2 is ok as you can forgo the extra switch since you will power the receiver only when the machine is on. I initially designed the system to shutoff power to the circuit breaker via the relay therefore needing the extra switch, but this would work since you are just controlling feed/oscillation. Just be aware of the extra small current draw on the wires due to the receiver if you are doing this.
The zip tie method just wraps the battery and goes under the plastic bottom platform the battery is resting on and above the plastic "oscillator and stand" plate below. You can route them through 2 small holes in the platform just near the front and back edge of the battery. Just be careful that the zip tie heads don't interfere with the rotational movement, I positioned mine out of the way so there wouldn't be any contact. This just restricts vertical movement since horizontal movement is limited by the plastic well impression.
thx man but the reason im puzzled with the feed control is because my switch wiring is not like on your circuit. It is like the one i did below. I did not changed anything on it. it was like that
here the pics of my switch.
http://img6.imageshack.us/i/p1010047an.jpg/
http://img683.imageshack.us/i/p1010046ur.jpg/
http://img685.imageshack.us/i/p1010045bw.jpg/
as you can see, if i follow you 1,2,3,4 numbers, lokking at the switch like when the panel is connected to the machine, my circuit is like that:
so wich wire do i have to cut on that circuit for feed? thx a lot!

Uploaded with ImageShack.us

Last edited:
drclawscat
New User
I see what you are saying, it looks like 3 and 4 may be reversed on ours. In that case you would be clipping 4 instead of 3. the only purpose of the "right side" of the switch is to power the feed. Basically the "left side provides power" from the circuit breaker and there is a wire to bridge the power to both sides of the switch. Once the switch is throw there are 2 separate connections made. 1 to 2 gets bridged, and 3 to 4 gets bridged.
Best to test first. To test, unplug 4 and turn on the machine making sure the feed is set above 0 (3 or above preferably). If all functions work except the feed carousel does not turn you've found the right wire. If the feed carousel turns then it would be a different wire. If you trace 4 all the way I believe it goes directly to the feed motor? I don't recall anymore.
When testing make sure all wires connectors are plugged in (except for the 4 wire you are testing) or you could cause the circuit breaker to pop up.
drclawscat
New User
Just realized your butt connector colors maybe flipped from mine as well, Which color connect on the main power switch is receiving power from the Circuit breaker?
The feed wire will be on the opposite side (left/right) of the switch from it. The wire you want to clip is coming OUT of that opposite side. The opposite side connection which has that little wire bridging left and right should not be touched but the other one (bottom in this case).
I.E.
TOP
power from CB ----> 1 3 (1 is connected to 3 by small red bridge wire)
2 4 <---- feed wire to cut/test
BOTTOM
drclawscat
New User
thx man but the reason im puzzled with the feed control is because my switch wiring is not like on your circuit. It is like the one i did below. I did not changed anything on it. it was like that
here the pics of my switch.
http://img6.imageshack.us/i/p1010047an.jpg/
http://img683.imageshack.us/i/p1010046ur.jpg/
http://img685.imageshack.us/i/p1010045bw.jpg/
as you can see, if i follow you 1,2,3,4 numbers, lokking at the switch like when the panel is connected to the machine, my circuit is like that:
so wich wire do i have to cut on that circuit for feed? thx a lot!
Uploaded with ImageShack.us
Ok last post on this, from your above diagram it looks like 3 is getting power, 1 is hot also. When you flip the switch 1 connects to 2 and 2 is the feed wire you want to clip. Like I mentioned test it out by unplugging just that 2 connector and see if the carousel stays put! Good luck.
on my machine, the yellow color receives power from the breaker (see my circuit)
so if i understand well, i should cut the thin red wire coming out of box 2 (see my circuit). It's the wire that goes to the carousel.
im gonna try this and let you know who it goes.. thx a lot
so if i understand well, i should cut the thin red wire coming out of box 2 (see my circuit). It's the wire that goes to the carousel.
im gonna try this and let you know who it goes.. thx a lot
Last edited:
i finally did it!
god it is so hard trying to rebuild that thing up. They really do not want us to open this! But when you've done it once i guess it would be easier the next times.
at first it wasnt working cause there was some connection that disconnected while i was putting the control panel back on so i had to re-open the machine to reconnect.
but now everything is fine and working and im so glad i put a larger battery in so i will not have to open this thing back for a long time!
the remote control works like a charm but like you said it would have been nice to be able to shut the machine off competly instead of just shutting the feed. But i didnt find 15amp 2ch remotes on the web. Anyway what's important is that i will be able to stop the machine launching balls if i want.
thank again drclawscat i would not have made it whithout your help!
Last edited:
drclawscat
New User
No problem, glad it worked out for you 
I had a beeyatch of a time getting the case closed. Best way I finally found was to get the d8mn thing off the floor put it on a table. Gives you way more control and leverage reassembling.
On the positive side, the way you have it wired up is exactly how it works from the factory. Also you can pause the feed and use the oscillation switch to adjust the angle of throw if you decide you want to change it. The other way would have been tougher since it would shut off instead of pause.
I found that the 20amp last for a long time even when I leave the machine on most of time for hours, so there's no way I'm draining it in one session unlike the puny 7amp that comes with.
Bolivian10s
Rookie
i finally did it!
god it is so hard trying to rebuild that thing up. They really do not want us to open this! But when you've done it once i guess it would be easier the next times.
at first it wasnt working cause there was some connection that disconnected while i was putting the control panel back on so i had to re-open the machine to reconnect.
but now everything is fine and working and im so glad i put a larger battery in so i will not have to open this thing back for a long time!
the remote control works like a charm but like you said it would have been nice to be able to shut the machine off competly instead of just shutting the feed. But i didnt find 15amp 2ch remotes on the web. Anyway what's important is that i will be able to stop the machine launching balls if i want.
thank again drclawscat i would not have made it whithout your help!
GOOD JOB!
Just wondering how many man hours you spent on this project and $$ spent.
i finally did it!
god it is so hard trying to rebuild that thing up. They really do not want us to open this! But when you've done it once i guess it would be easier the next times.
at first it wasnt working cause there was some connection that disconnected while i was putting the control panel back on so i had to re-open the machine to reconnect.
but now everything is fine and working and im so glad i put a larger battery in so i will not have to open this thing back for a long time!
the remote control works like a charm but like you said it would have been nice to be able to shut the machine off competly instead of just shutting the feed. But i didnt find 15amp 2ch remotes on the web. Anyway what's important is that i will be able to stop the machine launching balls if i want.
thank again drclawscat i would not have made it whithout your help!
Good job! I've been following the thread for while. Finally, you did it. I am thinking to try it with mine. Would you mind to give a summary, what remote you used, what type of battery, and the most important, how do you finally cut and re-wire? Thanks!
GOOD JOB!
Just wondering how many man hours you spent on this project and $$ spent.
when you know what to do it is not something hard or long to do. But i didnt know what to do so i left my machine open waiting for advice from other members.
what might take some time is open the machine and even more to close it (not that's its long to do but it just isnt made to be opened,)
cutting wires and reconnect them is not hard or long to do
i would say if i redo it right know (knowing how to do it) it would take me about 2h.
it cost me 40$ for the 20amps battery and 20$ for the receiver +2 remotes. + 10$ in electrical material (if you dont have it at home)
so about 70$ (about 130$ difference if you buy the edge star).
If you dont have a machine, i would advice that you get the edge star (130$ isnt that much for the trouble of doing this mod)
If you already have the edge lite, it is two really nice features to add (larger battery and remote control).
Last edited:
Good job! I've been following the thread for while. Finally, you did it. I am thinking to try it with mine. Would you mind to give a summary, what remote you used, what type of battery, and the most important, how do you finally cut and re-wire? Thanks!
to summarize:
-buy some 2ch remote and receiver found here http://www.carymart.com/index.php?main_page=index&cPath=66_67
-buy a larger lead acid rechargeable battery in your area (it has to be 12v, and about 18-20 amps). It must fit in the hole of the machine
-open the machine following these instructions http://www.sptennis.com/service/BatteryStarSport/
-replace the battery with the one you bought
-link the battery + - with the receiver + - (adding wires). Dont cut the existing wires!
- redirect (cut it) the gray wire of the sweep switch to the receiver (normally open holes). add wire lenght if needed by buying some 22 gauge grey color electrical wire)
-redirect the thin red wire from the power switch (the one that goes to the carousel motor) to the receiver (normally open holes). add wire lenght if needded
-close the machine
-try it
if you do it and have questions, feel free to ask!
Last edited:
I was thinking of making a remote off switch for my Tennis Tutor but it seems very complicated to make it wireless. My idea is to make a wired switch using an extension cord. I bought a foot switch and small aluminum project box that looks like a small guitar effects stomp box. I'm going to connect a long extension cord to it and run it to the machine. On the machine, I am going to cut one of the wires going to the battery and splice it to a short piece of extension cord with the female end sticking out of the case. If I don't want to use the shutoff switch, I'll put in a jumper made from an electric cord plug. To use the shutoff switch, I'll plug in the extension cord connected to the stomp box, turn the machine on, then use the stomp box to turn on and off.
Tes, thanks! Doesn't look so easy and you have to be able to read a schematic. Also, the links for the circuit boards and remotes are dead now and I wonder how much that combination costs if you can find it. Also, did I see that you need the large battery circuit to attach a remote?
rjw
Professional
thread revive
I am thinking of getting the Lite and changing out the batteery and adding a remote.
It seems that the latest edge models are all exactly the same except for battery and/or remote.
I can't see spending $200-250 just for the remote feature alone???
Can anyone tell me about the smart/fast charger? as in what it's max charge rate is? (for the hd battery)
thx
Similar threads
- Replies
- 13
- Views
- 4K
- Replies
- 3
- Views
- 3K
- Replies
- 12
- Views
- 4K