anirut
Legend
FIRST OFF: IF you need to quote this post, please DO NOT quote the whole post, as the pictures will be big and can be problematic to slower connections. Please quote only the text. If you don't know how to remove the picture quotes, then, please do not quote. Thanks.
Alright guys, grip shape is one of the most discussed problems on the board. There have been various DIY solutions suggested and they work to a certain extent.
The reason I call it "ultimate" is because you will be dealing with numbers that affect your grip, and not just "sticking-something-up-there-to-reshape" anymore. No more guess work. This method is a calculated method and guranteed to work (if you know how to do it properly).
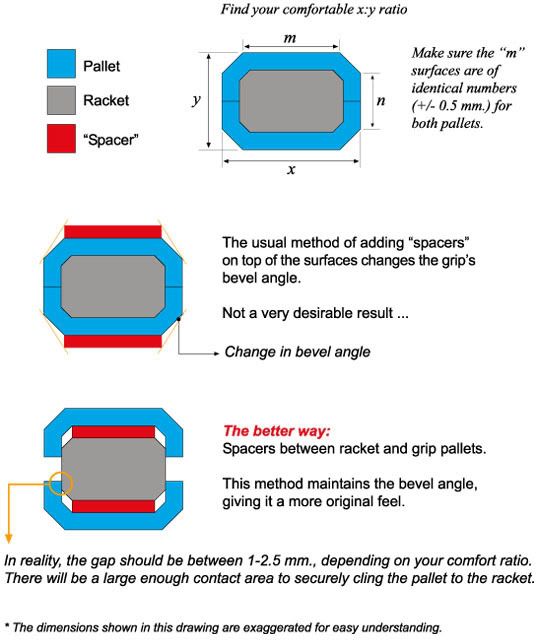
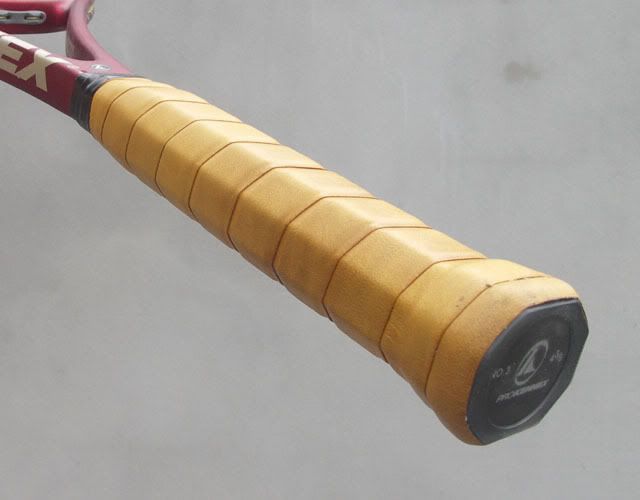
What I have found is that each grip shape has a certain ratio of x:y (see pic below). Each of us have a certain "comfort ratio" -- that's why we prefer a certain grip shape, a certain preferred ratio. This ratio is very important to our playability, as you all know.
So far, we've usually been increasing height to the "flatter" side to make the shape more square (as in trying to change Head shape to Wilson). This method adds height alright, but it changes the angle of the bevel and this could be problematic to our comfortably gripping the racket ergonomically. Moreover, this method can easily result in "rounded" bevels, could also make the grip roundish and may be easier to twist.
My solution hits the problem from another side -- underneath. This is through adding height under the pallets.
This picture shows the concept and cross-section of the work.
And ... How I did it ... Follow the steps carefully ...
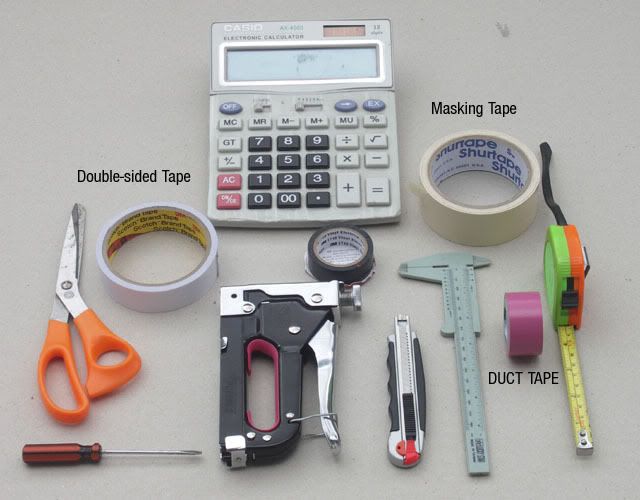
Prepare the equipment
Step 0: Find your preferred ratio
You may have many rackets, choose the grip shape that you like best. Remove the grip to the bare pallets and, using a vernier caliper, measure the dimensions -- the x, y, m and n. Note the precaution regarding the m side. (m and n can be measured with a ruler).
Divide x by y to get a ratio of 1:1.ddd (give it 3 decimals). Make a note of these figures. (I happen to like the Puma 4 1/2 grip shape and the ratio is 1:1.137)
Now that you have your preferred ratio, how much y-height to add to your existing racket's grip?
Measure you racket grip x & y value (eg. 30 & 25 respectively).
Then divide x by the ratio that you've found to prefer (let's say 1.145), that would be 30/1.145 = 26.2008 = 26.201
As your grip's y-height is 25, that means you'll need to add (26.201-25) = 1.201 mm.
That would mean adding 0.6 mm to each side ...
You can give it a +/- 0.01 ratio tolerance when your grip is to be reshaped.
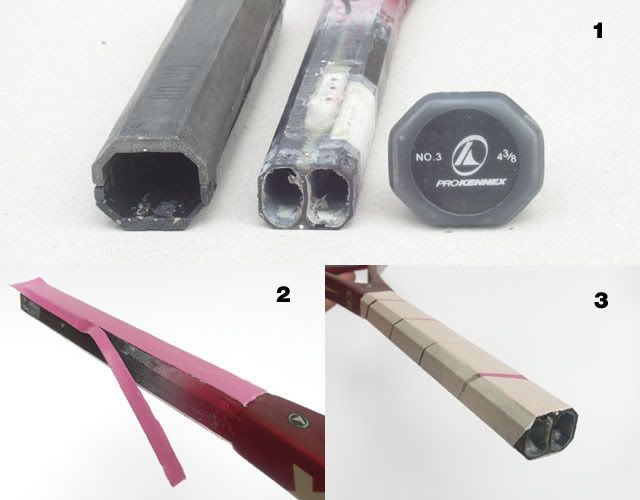
Step 1: Prepare your grip & racket for modification (Fig 1 above)
Now, get the racket that you use (and find the grip shape a bit of a problem). I assume you know how to remove the pallets without breaking them. Best is to have a spare (or just use it for the purpose). Clean the contact surfaces thoroughly. Make sure they are oil-free. I assume you know how to do this.
Step 2: Applying Duct Tape (Fig 2 above)
Yes, the simple, cheapo duct tape. One layer of duct tape is 0.25 mm. The picture above shows two layers of duct tape, making it 0.5 mm. in height.
As I need to increase a total of 1 mm., I add 0.5 mm on each side of the racket handle. You preferred ratio may differ. Adjust accordingly.
Trim off the overhang as shown.
Step 3: Wrap a layer of Masking Tape (Fig 3 above)
Wrap it tight enough and flat. Do not overlap the masking tape. This is to ensure that the duct tape won't move and also to create a good sticking surface for the double-sided tape (branding tape). This wrap may add up to 0.2 mm. in thickness.
Step 4: Measure the length -- VERY IMPORTANT
BEFORE you put any glue or tape either to the pallets or to the racket, place both pallets on the racket and close the butt cap so as to measure the racket length. Once you have the right length you want, mark the point where the pallets will be on the handle. Fig. 4 below shows my marker tape (on the racket) where the top of the pallet will touch the marker tape line.
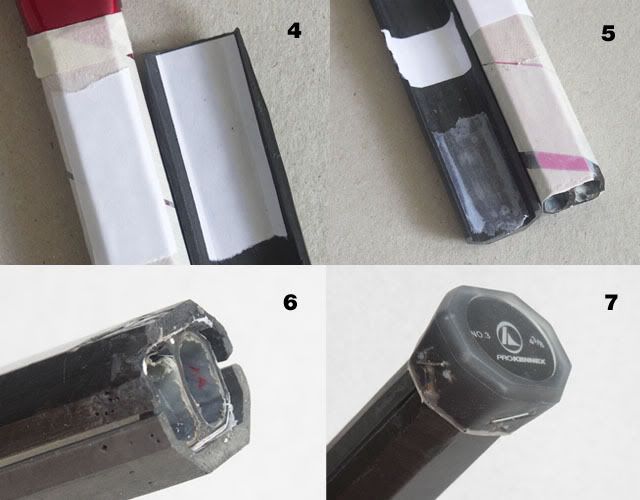
Step 5: Double-sided tape (Fig 5 above)
Once you know where the pallets will be on the racket, stick the double-sided tape on BOTH the surfaces -- the pallets and the racket.
A little caution here. DO NOT apply the tape to the whole length. Apply the tape like 2 or 3 inches top and bottom and across at the center. This will make it easier to remove if need be. However, they will be strong enough to last through your playing for a looooong time. Don't worry. (Hey, it it gets loose, you already know how to get it back in play.)
Step 6: Close the pallets (Fig 6 above)
Once everything is right (I presume so ...), remove the double-sided tape protection on the pallet and the racket and close the pallet on the racket ONE SIDE AT A TIME. Start with the side that has your length marker. Be very careful when carrying out this step because if you goof you'll have a hard time removing the pallet, as this may tear out the masking tape.
Assuming everything's fine, then close the other pallet (at the right measured length, of course) on the racket.
Now, to make sure they stick well ... just put the racket flat on the floor and stand on the grip/pallet part, kneading it with your feet for a while. (Sorry, no pic.)
Fig 6 also shows the 1.2 mm. gap and the slightly extended pallets to get the racket to the right length.
Step 7: Finish the butt cap (Fig 7 above)
Close the butt cap, staple it and the work's done.
This method may increase the grip size up to 1 or 1.5 size, depending on the increase in the y-height. I have not measured the increase in weight. A rough guess would be around 3-4 grams max. (Hey, duct tape is quite heavy ...)
REMEMBER: The key is your preferred ratio. Find that and go ahead!! I hope this method will help you guys enjoy your tennis more and more!!!
NOTE: I'm giving this knowledge free of charge. Please DO NOT CHARGE ANYONE if they ask you to help them with grip reshaping. In the event that the person asking you to help plays tennis to earn money, then charge reasonably for a one or two-hour labor only. The cost of material is much less than the life of a cockroach.
BTW, I also assume you know how to do calculations using a calculator ... haha
Alright guys, grip shape is one of the most discussed problems on the board. There have been various DIY solutions suggested and they work to a certain extent.
The reason I call it "ultimate" is because you will be dealing with numbers that affect your grip, and not just "sticking-something-up-there-to-reshape" anymore. No more guess work. This method is a calculated method and guranteed to work (if you know how to do it properly).
What I have found is that each grip shape has a certain ratio of x:y (see pic below). Each of us have a certain "comfort ratio" -- that's why we prefer a certain grip shape, a certain preferred ratio. This ratio is very important to our playability, as you all know.
So far, we've usually been increasing height to the "flatter" side to make the shape more square (as in trying to change Head shape to Wilson). This method adds height alright, but it changes the angle of the bevel and this could be problematic to our comfortably gripping the racket ergonomically. Moreover, this method can easily result in "rounded" bevels, could also make the grip roundish and may be easier to twist.
My solution hits the problem from another side -- underneath. This is through adding height under the pallets.
This picture shows the concept and cross-section of the work.
And ... How I did it ... Follow the steps carefully ...
Prepare the equipment
Step 0: Find your preferred ratio
You may have many rackets, choose the grip shape that you like best. Remove the grip to the bare pallets and, using a vernier caliper, measure the dimensions -- the x, y, m and n. Note the precaution regarding the m side. (m and n can be measured with a ruler).
Divide x by y to get a ratio of 1:1.ddd (give it 3 decimals). Make a note of these figures. (I happen to like the Puma 4 1/2 grip shape and the ratio is 1:1.137)
Now that you have your preferred ratio, how much y-height to add to your existing racket's grip?
Measure you racket grip x & y value (eg. 30 & 25 respectively).
Then divide x by the ratio that you've found to prefer (let's say 1.145), that would be 30/1.145 = 26.2008 = 26.201
As your grip's y-height is 25, that means you'll need to add (26.201-25) = 1.201 mm.
That would mean adding 0.6 mm to each side ...
You can give it a +/- 0.01 ratio tolerance when your grip is to be reshaped.
Step 1: Prepare your grip & racket for modification (Fig 1 above)
Now, get the racket that you use (and find the grip shape a bit of a problem). I assume you know how to remove the pallets without breaking them. Best is to have a spare (or just use it for the purpose). Clean the contact surfaces thoroughly. Make sure they are oil-free. I assume you know how to do this.
Step 2: Applying Duct Tape (Fig 2 above)
Yes, the simple, cheapo duct tape. One layer of duct tape is 0.25 mm. The picture above shows two layers of duct tape, making it 0.5 mm. in height.
As I need to increase a total of 1 mm., I add 0.5 mm on each side of the racket handle. You preferred ratio may differ. Adjust accordingly.
Trim off the overhang as shown.
Step 3: Wrap a layer of Masking Tape (Fig 3 above)
Wrap it tight enough and flat. Do not overlap the masking tape. This is to ensure that the duct tape won't move and also to create a good sticking surface for the double-sided tape (branding tape). This wrap may add up to 0.2 mm. in thickness.
Step 4: Measure the length -- VERY IMPORTANT
BEFORE you put any glue or tape either to the pallets or to the racket, place both pallets on the racket and close the butt cap so as to measure the racket length. Once you have the right length you want, mark the point where the pallets will be on the handle. Fig. 4 below shows my marker tape (on the racket) where the top of the pallet will touch the marker tape line.
Step 5: Double-sided tape (Fig 5 above)
Once you know where the pallets will be on the racket, stick the double-sided tape on BOTH the surfaces -- the pallets and the racket.
A little caution here. DO NOT apply the tape to the whole length. Apply the tape like 2 or 3 inches top and bottom and across at the center. This will make it easier to remove if need be. However, they will be strong enough to last through your playing for a looooong time. Don't worry. (Hey, it it gets loose, you already know how to get it back in play.)
Step 6: Close the pallets (Fig 6 above)
Once everything is right (I presume so ...), remove the double-sided tape protection on the pallet and the racket and close the pallet on the racket ONE SIDE AT A TIME. Start with the side that has your length marker. Be very careful when carrying out this step because if you goof you'll have a hard time removing the pallet, as this may tear out the masking tape.
Assuming everything's fine, then close the other pallet (at the right measured length, of course) on the racket.
Now, to make sure they stick well ... just put the racket flat on the floor and stand on the grip/pallet part, kneading it with your feet for a while. (Sorry, no pic.)
Fig 6 also shows the 1.2 mm. gap and the slightly extended pallets to get the racket to the right length.
Step 7: Finish the butt cap (Fig 7 above)
Close the butt cap, staple it and the work's done.
This method may increase the grip size up to 1 or 1.5 size, depending on the increase in the y-height. I have not measured the increase in weight. A rough guess would be around 3-4 grams max. (Hey, duct tape is quite heavy ...)
REMEMBER: The key is your preferred ratio. Find that and go ahead!! I hope this method will help you guys enjoy your tennis more and more!!!
NOTE: I'm giving this knowledge free of charge. Please DO NOT CHARGE ANYONE if they ask you to help them with grip reshaping. In the event that the person asking you to help plays tennis to earn money, then charge reasonably for a one or two-hour labor only. The cost of material is much less than the life of a cockroach.
BTW, I also assume you know how to do calculations using a calculator ... haha
Last edited:
")